Create an HTML Invoice: Difference between revisions
m add syntax highlighting |
Hsymington (talk | contribs) m Added to the How To category |
||
| Line 86: | Line 86: | ||
[[Image:WaybillSample.JPG]] | [[Image:WaybillSample.JPG]] | ||
[[Category:How To]] | |||
Revision as of 12:04, 4 March 2020
The Goal
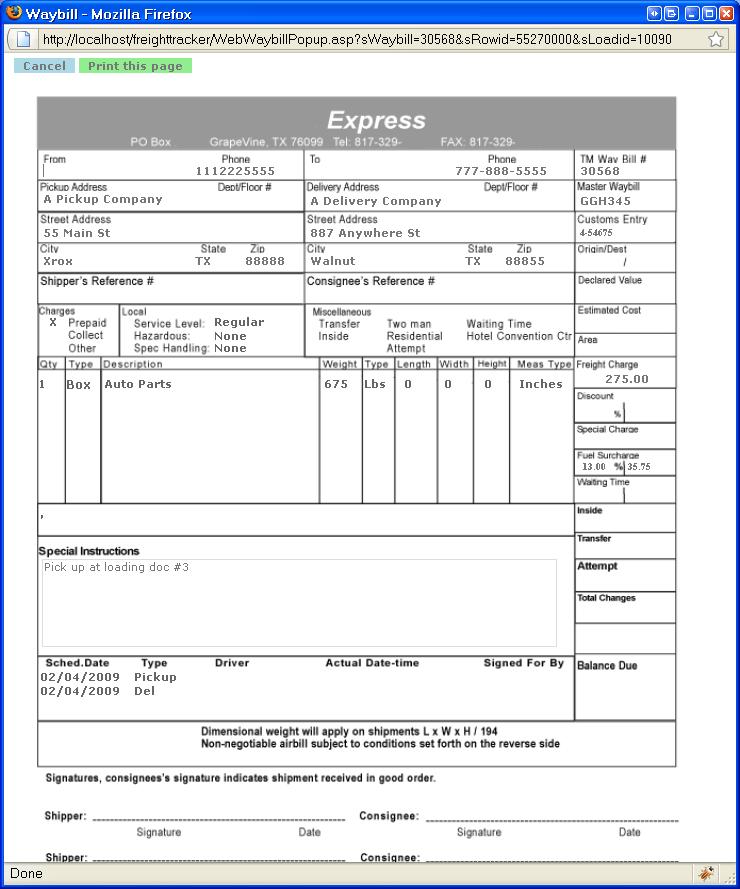
Ever need to create an HTML printable invoice for your customer with all of those little blocks and lines? And then try to electronically fill the required data in the little spaces? It can be a challenge in Windows, and even more so in HTML. There is an easier way than trying to do it as described above - instead, place your data on top of an image. Scroll down to the bottom and look at the screen shot.
Essentially it works like this.
The Form
Create an exact size image. For testing you can take a screen shot of your invoice or create a copy of your invoice using Quark or one of the other similar products that are designed for this purpose. Doing it this way provides a much nicer image. Use a PNG file format, it’s more robust than JPG.
A “span” tag is used to group HTML and can also be used to “hook” information onto that HTML. Here we will use it to enforce accurate positioning of the data elements on top of the image. An example will help.
    <form>
        <span id=”rel” style="FLOAT: left; POSITION: relative">
           <span id=”abs” style="LEFT: 28px; POSITION: absolute; TOP: 90px" >
               <td class="Data"><input size="14" name="loadInfo__pu_contact" /></td>
           </span>
            <table>
                <tr>
                    <td>
                        <img src="images/Waybill.png" height="881" width="690" align="left" alt="Waybill.png">
                    </td>
                </tr>
            </table>
        </span>
   </form>
Normally a span or div tag with some kind of positioning will position itself relative to the upper left corner of the browser. That would be ok if you only ever used that particular browser and only one page. The difficulties begin when you page down and back, or print - the positioning becomes unstable and you can't count on anything being shown in exactly the same place every time.
Notice the use of both relative and absolute positioning in the above span tags. Relative positioning means that the coordinates are relative to something else. So, the premise is that for each page we need to establish an anchor other than the browser window itself. The id="rel" span serves as the main anchor for the page, the id="abs" tag will always appear in relation to the outer span tag. The "id"s shown in the above example are not necessary and are there only for purposes of identification.
In the above case, the coordinates of id=”rel” are relative to the form and the coordinates of id=”abs” are relative to “rel”.
If you want to have multiple pages, it gets a little more complicated as you will need a table to hold it all. In the cell, just before the second page, simply force a pagebreak as shown in the pseudo code below. Printing of the invoice pages should track the browser layout exactly! And, be browser independent. If it doesn't - the browser shows one way and printing shows everything in a different position, then something is incorrect.
  <table>
    <tr>
      <td>
         <pagebreak here - this one might not be necessary, depending on what's above...>
         <span id=”rel” style="FLOAT: left; POSITION: relative">
           <span id=”abs” style="LEFT: 28px; POSITION: absolute; TOP: 90px" >
               <input size="20" name="loadInfo__company_name" />
           <span id=”abs” style="LEFT: 28px; POSITION: absolute; TOP: 100px" >
               <input size="14" name="loadInfo__phone" />
           </span>
            <table>
                <tr>
                    <td>
                        <img src=1st image...>
                    </td>
                </tr>
            </table>
        </span>
       </td>
    </tr>
    <tr>
      <td>
         <pagebreak here>
         <span id=”rel” style="FLOAT: left; POSITION: relative">
           <span id=”abs” style="LEFT: 28px; POSITION: absolute; TOP: 90px" >
               <input size="14" name="loadInfo__contact" /></span>
            <table>
                <tr>
                    <td>
                        <img src=2nd image...>
                    </td>
                </tr>
            </table>
         </span>
       <td>
     <tr>
  </table>
Showing the data
The invoice data is shown in regular input fields, but the borders are suppressed. Put the following in your "head" section.
The bk tag makes adding a pagebreak easy.
    <style>
        input {font-weight: bold; type="text"; border: 0; font-size: 10px; readonly="readonly"; }
        bk {page-break-after: always;}
    </style>
