Using GIT for Dataflex Development
Why Version control
Before we jump into GIT in specific, it is important to mention some reasons why developers are more productive when using version control;
- We can keep track of multiple versions deployed
- Multiple developers can be working on same project
- It is helpful with code checks for auditing or training
- A proper change log of each change is maintained
- We can locate changes for one feature/fix across a number of changed files
- The code is in a safe location, in case of lost hardware
- We can find when a located bug was introduced, so you can see what clients are effected
It can be tough when you are looking at a piece of code, not knowing when/how it’s used. But when you can run a version control tool, which shows exactly when those lines were added, by who and with what description, it makes it so much easier to decide what to do with that piece of unknown code, whether it’s retiring it, refactoring, documenting or just leave it as it is. Another good reason that warrants its own paragraph is when you are developing using Agile sprints/iterations. Oversimplified, you determine a list of features you or your team are going to implement in order of priority, but your iteration is timeboxed to eg 4 weeks. This means that after 4 weeks all approved and tested code stays in the product and the features that did not make it in full or are not fully tested and or approved, are to be taken out and used for the next sprint/iteration. This warrants for a good use of version control, where each feature can very easy be isolated from the packaged software.
Types of version control tools
Version control is a way of work, not a tool itself. There are many version control systems, some are more suitable for the VDF development cycle than others. We can identify the following types. Historically version control was done by directory backups e.g. by using zip and file naming. The result is very near identical copies. It also requires a lot of self discipline. Centralised version control has been very popular for years, where you have one centralised server and many remote clients. Examples are CVS, Subversion, Vault, Visual Source Safe and Team Foundation Server. These work very well when you are connected to the server. When not connected these are not giving much assistance. Distributed version control is the latest and most popular peer to peer version control tool. Examples are Mercurial (hg), GIT, BitKeeper etc. This white paper focuses on the last category of distributed version control, with GIT in particular. If you are currently using a Centralised version control, you might be interested in the following list of major changes with the Distributed flavour;
- No access to a server is required, the distributed VC has a local repository that gets synch’ed with a remote (central or peer to peer) repository when it can but can work fine on its own.
- Each developer has his own repository local to their working directory
- No file checkout is required, just start changing the files
- You can stage a number of files, so multiple files can be part of one commit (maintaining the relationship of the changes in the files)
- You can optionally stage only a couple of changed lines in a file (if more changes are made then you want to stage).
- You commit the staged changes with a comment
- You push and pull changes between the local and remote repositories
- Branching used to be hard and therefore hardly used. Now really simple.
- But commit is local, so developers have to do a push to remote to make the change visible for other developers to do a clone/pull from remote
Installing and using GIT
Enough theory, we’ll now show how it’s done. GIT is very small and easy to uninstall later if you decide to do so, therefore I strongly suggest you just follow these steps and perform these yourself while reading this white paper.
Download and install GIT-Gui
Navigate your browser to http://git-scm.com/downloads and download the latest windows version (at time of writing 1.8.0 and about 15Mb in size). Install on your machine, I recommend keeping the installer suggested components, and suggested ‘Adjusting of PATH environment’. The latter helps when creating menu’s in VDF Studio. The ‘Configuring the line ending conversions’, leave for VDF development as checkout as-is, commit as-is.
Creating your first repository
Let’s create a GIT repository of the Dataflex example Order Entry workspace. This workspace always is clean when VDF is installed but in my case, full of test and other changed code after a while. Being able to go back to the original version seems like a good idea for a first repository.
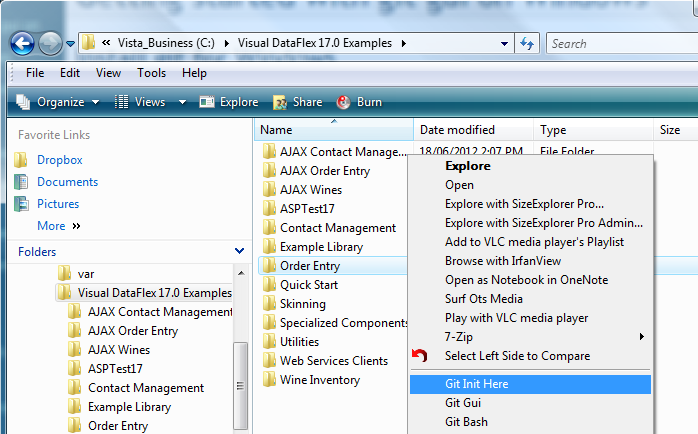
Start with navigate to and select the workspace directory then use the right click (short cut) menu, and select ‘Git Init Here’ as below.
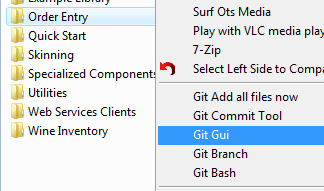
The Git Init takes about a second. In this second it initialised a local repository in this work directory. You find that a subsequent right mouse click on the same directory now shows a different short cut menu;
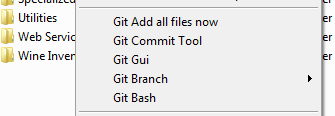 Inside the Order Entry directory you see a new hidden directory ‘.git’. This directory contains the whole local repository. So if you would delete this, the repository is gone.
Although the repository is created, it has not added any of our files. For this to happen we need to stage the files and then commit. We do this in the following steps;
Go back to the workspace directory and select ‘Git Gui’ from the shortcut menu on the Order Entry directory.
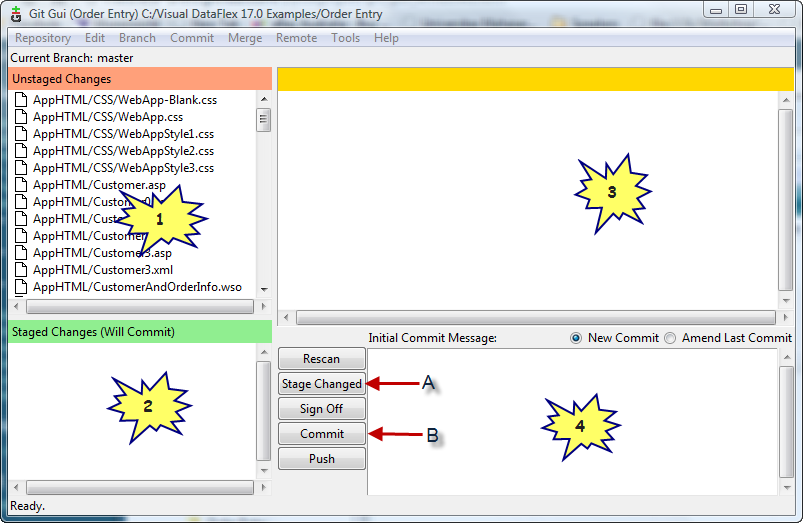
Git Gui will start like below
Panel 1 shows all files that are detected to differ from the repository. As the repository is empty, this means this list contains all files. Clicking on a file name (not the icon) shows in panel 3 the changes compared with the repository version
Panel 2 has the files that you have indicated you want to stage for commit. Clicking on the icon of a file in Panel 1, shifts the file from Panel 1 ‘Unstaged Changes’ to panel 2 ‘Staged Changes’.
If this starts to sound all too complicated bare with me, it is really not that hard and there are very good reasons for doing the staging this way
When you look at the files in Panel 1, the Unstaged Changes, you find that it has a number of files you do not want to track such as IDESrc/Workspace.loc, possibly files in the data directory etc.
We can teach GIT what files to ignore by placing a file called .gitignore in the workspace directory. The content of the file is;
#Exclude the following files for DataFlex Projects
####################################
programs/*.exe
programs/*.dbg
programs/*.exe.manifest
programs/webapp.log
appsrc/*.dep
appsrc/*.fld
appsrc/*.pbg
appsrc/*.pdp
appsrc/*.pkd
appsrc/*.prp
appsrc/*.err
data/*.cch
ddsrc/*.bak
idesrc/studiometadata.mtd
idesrc/workspace.loc

vssver2.scc
nppbackup

#personal preference
####################################
appsrc/*.prn
idesrc/*.dsk
So create this file in notepad, insert the above content and save with filename’.gitignore’ as sibling next to the ‘Order Entry.sws’ file.
If you kept Git Gui open, use the ‘Rescan’ button (or F5 key) and confirm that the unwanted files are no longer shown in the list of Unstaged changes.
Ok, now it’s time to stage all not to be ignored files. You can either select each file in Panel 1, by clicking its icon, use the shift key to select multiple and use Ctrl+T Stage to commit, or click ‘Stage changed’ button (that I marked with ‘A’ in the screenshot).
Now enter the Initial Commit Message like ‘VDF 17.0 Order entry sample as released by Data Access’. And click the ‘Commit’ button (marked with ‘B’ in my screenshot).
You noticed that the commit was really quick, and all panels are blank. You have just created a new repository, told GIT what files to ignore, and committed all other files into the repository.
Setting up the author in GIT
When you commit, GIT keeps track of not only the changes, but also of the Author of the changes. In the above initial commit, we did not set this and as DAW is the author this did not really matter, but changed from now on, should have yourself as the author.
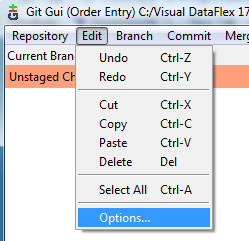
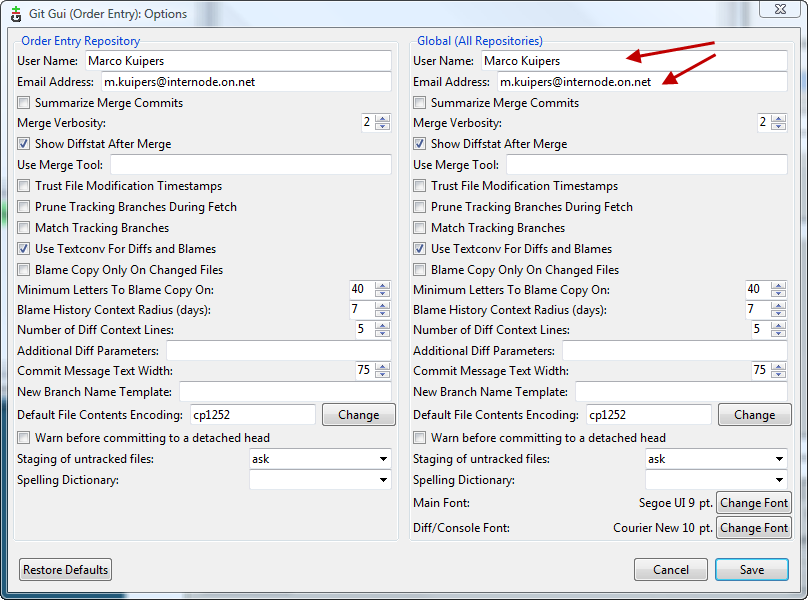
To set the Author select menu Edit – Options.
As you can see there are many settings you can do. For now just set the Username and email address as indicated below with the arrows.
Using git
Making changes and revert back
We have our safe initial commit so we can make changes to our hearts content.
Open the Order Entry.sws. Let’s say you want to add the container3D around the objects in the customer view to make it consistent with the other views in this workspace. So I selected in the Design view the Customer Number and Name form, as well as the dbTabDialog. Did Cut, dragged a Container3D from the palette, made it big enough, Pasted the objects back in (while Container3D was selected) and resized the container holding CTRL key to make sure it does not resize the objects. Then I compiled the projects and confirmed all was working.
Notice that I did NOT have to checkout any files!
So when happy with the changes, switch back to Git Gui (Alt+Tab if you leave it running), and do a Rescan by clicking on the button or F5.
Two files are loaded in the Unstaged Changes. As you select the filename you see the changed lines in the third panel.
In this example we have no interest in committing any changes and basically want to lose all uncommitted changes.
From the menu select Branch-Reset. A warning dialog will indicate that you indeed will lose all uncommitted changes. Select Yes.
Switch back to VDF Studio and notice that the customer view is back to what it was.
Now hold-on you might say, why is this in the branch menu, I would not have looked there... When we look a bit further at branching I promise it will make more sense. If impatience; the short answer is that the master is also a branch.
Creating a branch and making changes
As a developer you should not create changes direct in the master branch. Instead you should create a branch specific to the change you want to make (topic branch), and then when you decide to keep the change, merge the topic branch into the master (or even better in a release branch).
There are two methods of organising the topic branches. The first way is as sibblings, the other way is consecutive. This document starts with the sibbling way.
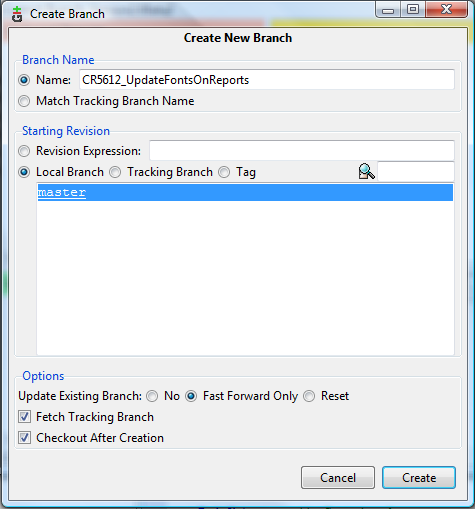
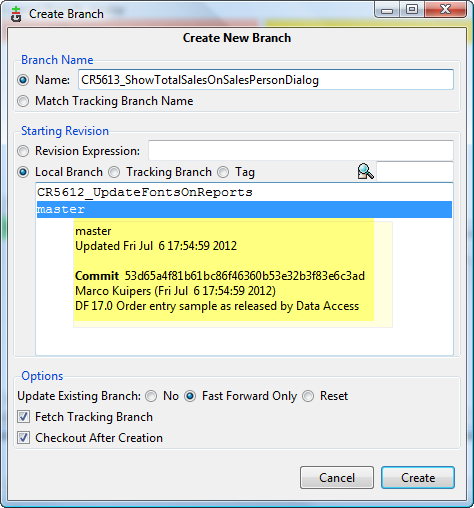
Let’s create a new branch; switch back to Git gui and select menu: branch – create to open the following dialog;
I’ve entered a branch name. Notice that the dialog does not allow you to insert spaces, so use Mixed case notation. Use a naming that refers to an ID in your change request system so use something like “CR5612_UpdateFontsOnReports “.
Notice that the starting revision is ‘master’ but don’t worry about this too much, otherwise you might think it’s more complex than it is.
So click on Create after you entered the name. The dialog changes and all you are left in is the message above the Unstaged Changes panel showing the current branch.
Make some changes like commenting out the Crystal reports to save compile time (Includes and menu’s). And replace in CustomerListWP.rv the ‘arial’ font to ‘Segoe UI’.
Compile the project and see how much better the report looks.
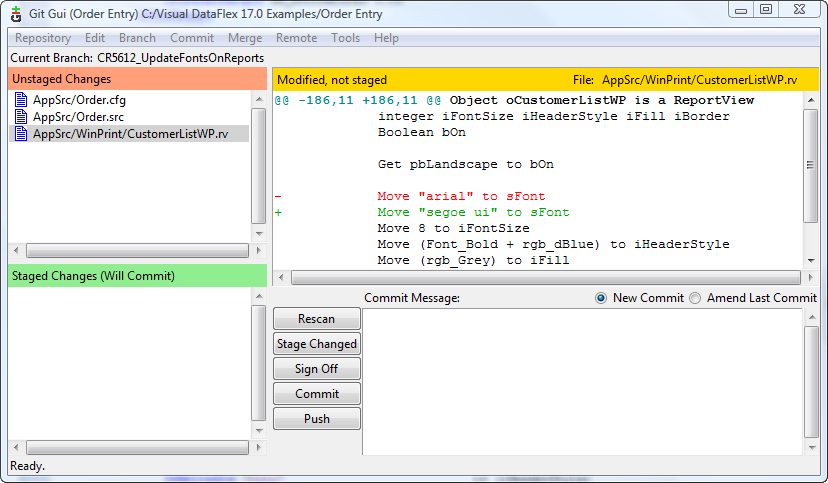
Switch back to Git Gui and do a Rescan.
You see the three changed files, and at the right the line old and new line.
Let’s assume that this is all the change you want to do for now. The work is not fully done, as you want to change the font on all the reports, but need to attend to another change you want in your project.
So you stage and commit these changes into this branch. Click ‘Stage Changed’ button (or Ctrl+I), enter a commit message eg ‘Changed first report and removed crystal reports’. Click ‘Commit’ (or Ctrl+Enter).
The next change you want to make is not related to the above change. So you create a new topic branch. You’ll soon found that for each individual programming request you want to create an own topic branch.
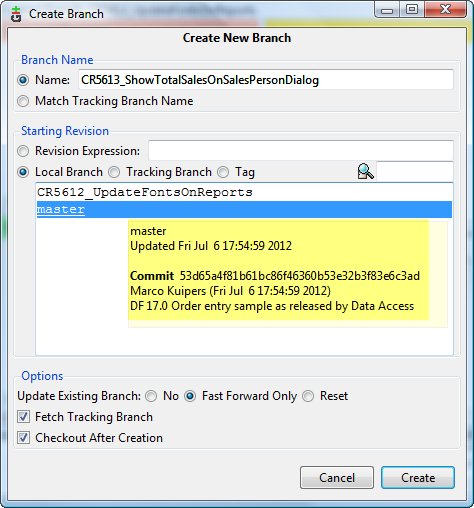
But take care when creating the new branch; you want to create this from the master. So in the create branch dialog (Menu Branch-Create), you want to select the master as the Starting revision local branch;
I use the name ‘Topic branch’. This is not a name used in GIT itself, but it is used in the GIT documentation to refer to a branch created for the purpose of creating, updating or removal of a specific feature.
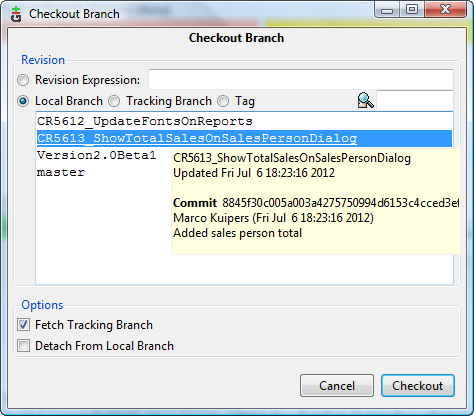
Hovering over the branch names shows some information regarding the branch, which for the sake of this document highlighted in a green box.
When you click create, you see that the Current Branch is changed to the newly created one.
As you selected the master to be the starting revision, you will also find that when switching back to the VDF Studio, the state of source code is back to what it was when we committed the master. This might worry you but this is a good thing.
Please confirm that the Crystal reports are back and the font is also back to arial.
If you made a mistake and did not base the new branch on master, just switch away from the new branch with Branch-Checkout and select master. Then do menu Branch-delete and select the wrongly created branch. Once deleted create the new branch again, but this time based on the master.
Make a change like adding the Total sales to the Sales Person entry view. In this revision we just calculate on the spot, but we might later add a field for it;
I inserted ‘Use for_all.pkg’ at the top of the SalesP.vw code and the code below just before the End_object of the oContainer1;
        // This only works from VDF 17.0 where Refresh is also send to containers
        Procedure Refresh Integer eMode
            Send CalculateTotalSales to oTotalSalesForm
        End_Procedure

        Object oTotalSalesForm is a Form
            Set Size to 13 44
            Set Location to 4 182
            Set Form_Datatype to Mask_Currency_Window
            Set Enabled_State to False
            Set Form_Mask to "$,0."
            Set Label to 'Total sales:'
            Set Label_Col_Offset to 2
            Set Label_Justification_Mode to jMode_Right

            Procedure CalculateTotalSales
                Number nTotalSales
                Open OrderHea
                For_All OrderHea by 0
                    Constrain OrderHea Relates to SalesP
                    do
                        Add OrderHea.Order_Total to nTotalSales
                End_For_All
                Set Value to nTotalSales
            End_Procedure
        End_Object
Switch back to Git Gui and do a rescan (F5). You see that SalesP.vw and probably order.cfg are changed.
If you are happy with the changes, then Stage and commit them.
Merge branches
The previous section might unsettle you a bit. We made two changes, both from the same base code (master) but now we want to compile them both into one test version to give to the testers.
We do this by merging. We first create a new branch called ‘Version2.0Beta1’, with starting revision ‘master’. When done we have again the source code the same as the master.
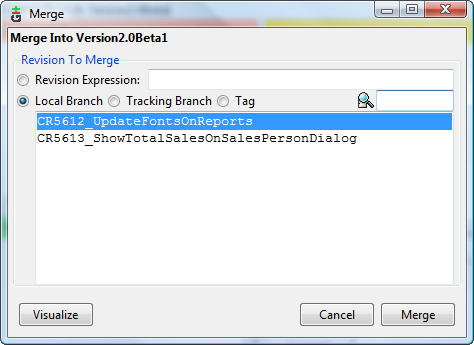
Now we merge the changes in the branch ‘CR5612_UpdateFontsOnReports’ and ‘CR5613_ShowTotalSalesOnSalesPersonDialog’ into this ‘Version2.0Beta1’ branch. Do a local merge via menu open Merge-Local Merge, or Ctrl+M.
Select the first branch and click Merge. Then go back to the Merge dialog (Ctrl+M) and select the other one.
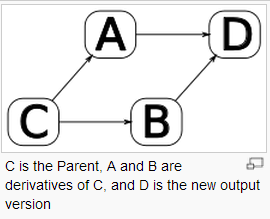
Git has a fantastic build in 3 way merge, illustrated in the image on the right.
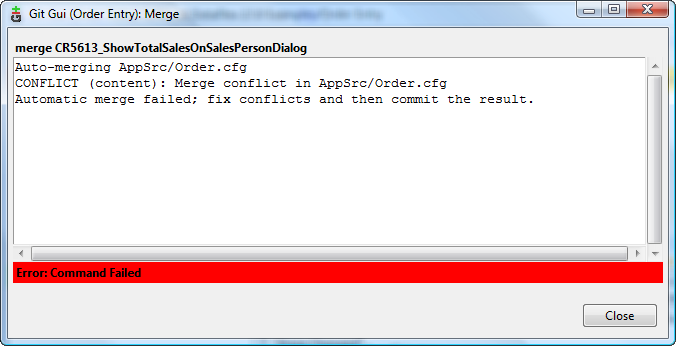
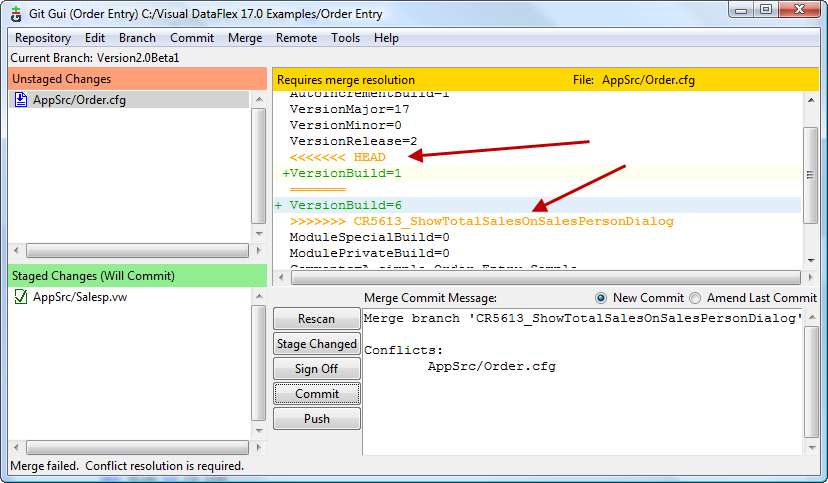
However you possibly see that that there is a conflict and the Automatic 3way merge failed as a change from the base version was found in both branches on the same line. This raises a merge conflict. The following screens go into solving this;
Close the dialog informing you of the merge fail and check the presented merge conflict. I’ve drawn two arrows to the important text.
The text ‘VersionBuild=1’ is indicated with ‘HEAD’. This is a pointer to the local current branch, and thus indicates the current committed code for the current branch. The ‘VersionBuild=6’ is marked with the branch name ‘CR5613_ShowTotalSalesOnSalesPersonDialog’.
Please note if you compiled both source codes the same number of times or have turned ‘Auto-increment build version’ off in the project properties, you will not have this conflict. Also if you checked in the branch in the other order, you would have the other branch shown here.
In this case the build number is probably not of great concern but, it is great that GIT detected that you have a change in both branches on the same line and just want to show you this so you can make the correct decision regarding fixing this.
In reality the file in your workdirectory is updated with the <<<Head ... >>> Branch text. This file is also shown as unstaged. You have the following options:
- Update the file outside of git-gui (in this stage eg notepad++). Then save the manually merged file, do a Rescan, Stage & Commit
- Run Mergetool (eg. KDiff3) to show the base(closest common parent), the first and already merged branch, and the second branch. You can simply select the change to keep. It will create by default a .orig with the merge conflict
- Use remote version (latest merge) /Local version (previous merge) or Base (closest common parent)
Whatever your choice of addressing the merge conflict, you stage and commit the version to keep.
Now Switch back to the studio, compile the project and confirm that both the sales person amount and the winprint changes are in this ‘Version2.0Beta1’ branch.
The test version is ready for... testing.
Just remember to merge, switch to (checkout) the branch you want to merge into. Then select the branch that you want to merge into the current branch.
Further changes required on one of the change requests
As normal the test version comes back with a number of changes that are required. Let’s say that the first one is that the total amount form should not be visible if no record is shown.
It could be tempting to make this change in the ‘Version2.0Beta1’ branch but resist. The changes should be made in the branch linked to the change request. So we need to switch branches. In Git this is called ‘checkout’. This does not have much to do with the function Checkout in centralised version control systems, but you can imagine its function is related.
So via the menu do Branch-Checkout or Ctrl+O. On the Checkout Branch dialog select the CR5613_ShowTotalSalesOnSalesPersonDialog local branch and click Checkout.
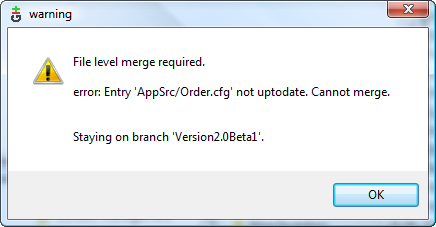
If you get an error ‘File level merge required’ regarding the Order.cfg, it means that this file is changed on disk from the current committed code in the current branch (still Version2.0Beta1). This would have been as you probably compiled the code after the last merge and still had the Auto increment on.
So GIT basically checks if any changes would have been lost by changing to another branch (checkout) while the changes were not yet committed or reset.
So we just click ok on the dialog. We rescan and stage the order.cfg file, but for the commit we do not enter a message, instead we use the radio box and move from ‘New commit’ to ‘Amend last commit’. We then do Commit.
This feature of Amend last commit is very helpful when you just committed something and find that you forgot a feature have a silly bug etc and just don’t want this to be tracked as a separate commit.
Now we can go back to our checkout of the CR5613_ShowTotalSalesOnSalesPersonDialog branch. Use Ctrl+O, select the branch and click checkout.
Confirm that the current branch switched;
Switch back to VDF Studio and the SalesP.vw file. Change the Refresh procedure to the following code:
        // This only works from VDF 17.0 where Refresh is also send to containers
        Procedure Refresh Integer eMode
            Handle hoServer
            Boolean bHasRecord

            Get Server to hoServer
            Get HasRecord of hoServer to bHasRecord
            If (bHasRecord) Send CalculateTotalSales to oTotalSalesForm
            Set Visible_State of oTotalSalesForm to (bHasRecord)

            Forward Send Refresh eMode
        End_Procedure
Compile and confirm the code.
To avoid further issues with the config.cfg we will turn the auto increment off. Although I think there is a lot of value in the build number, I think it should be increased for every version that leaves the developer (test and release versions), not during the actual development. In the VDF Studio do Project – Project Properties, select the Version tab and untick the Auto-Increment build version. Click OK to save the change.
We now want to attend to the other changes to the winprint report. But we have not staged and checked in the new code. If you were to forget the ‘file level merge is required’ would appear again. We don’t want this, so we properly stage and commit the change as a new commit with eg ‘Request 1 from testing beta1, hide total amount form on clear.’
We change branch by Checkout of the PlayWithWinPrintReports and make out changes there.
When these are all nicely done and committed, we create a new branch‘Version2.0Beta2’, based on master and merge the two branches in.
You could decide to create the new branch based on ‘Version2.0Beta1’. I personally don’t see an advantage of this, but you could.
Branching – Merging wrap-up
I think each change request should have its own branch. As you have seen above, it is really easy to create branches, merge the changes and create (test) release branches with the features. This has advantages that features that are not complete at the time of release will simply not be merged into that release. All code changes stay in the branch and will be further worked on when you decide to do so. Working properly with branches means there is a minimal risk of issues and make it much easier to make Agile iteration/sprints where a release is time boxed but the less critical features are not.
You could see the topic branches as only developer help. The commits should have the proper references to the code and properly document the changes. Therefore once the topic branch is merged into the master, the topic branch itself can be deleted, as all the commits are inserted into the master branch.
Using GIT during developing & a centralised VCS for releases
You might find yourself in an environment where the boss insists on using a centralised version control like VSS or Vault for the releases, but you are keen on using GIT with its awesome branch feature.
You would join a great deal of young developers that during their study the last years developed open source software and are very aware of the advantages of GIT. They new find themselves in this situation where they feel they have to do a step backwards.
I think, and many online agree that the two VCS’s are not mutually exclusive. You can use GIT during the development, smoke testing or even proper testing and get all the advantages of the development freedom. When it is time for releasing, just check the code into your centralised VCS.
Multiple developers, multiple repositories
In previous section you got familiar with staging, committing, branching and merging. All of these actions were done on the local repository.
More than likely you are working in a team of developers or at least want a safe backup of the repository. In both cases you want to synchronise your local repository with one or more remote repositories.
Create a remote backup repository
To make a backup of your repository you can either use a hosted solution or just on another piece of hardware in the network. The follow the following steps show the latter.
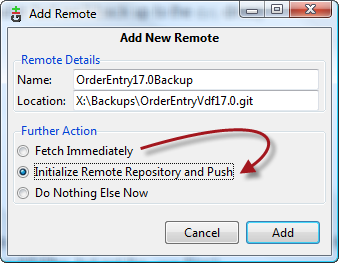
In Git Gui choose menu Remote – Add. Give the backup location a name and the path. Although not mandatory, its common to give the foldername a .git extention.
Make sure you change the ‘Further Action’ from ‘Fetch Immediately’ to ‘Initialize Remote Repository and Push’, and click Add.
If you are putting a network drive as the location, make sure you use ‘//drive/dir/dir’ instead of ‘\\drive\dir\dir’. Otherwise you will have issues later on.
What just happened in simplified terms, is that important content of the workspace .git folder is copied and links are setup between the local and the remote repository. This remote repository is often called a ‘bare repository’ is it does not have a working directory.
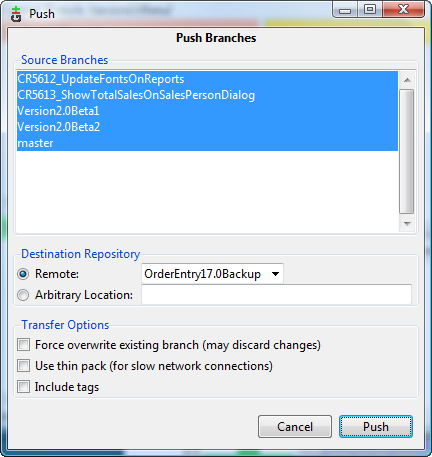
After you make changes to your local repository, and you would like to update the remote repository, all you have to do is a Push. Menu: Remote – Push or (Ctrl+P);
By default the current branch is selected as Source Branch, but you could like above select multiple (Shift or Ctrl left click) branches to be updated.
Please note that you are pushing the whole history of commits, not just the latest state.
Creating a local repository from a remote repository
So your mate has started to use Git in his local repository, and made a backup remote repository on the server. You have to also do some work on this project so you need a local repository.
In Git terminology you want to clone an existing repository.
To practice this there is no reason that this would not be on the same machine (just different directory). Even the remote backup created could have been on the same local machine in its own directory.
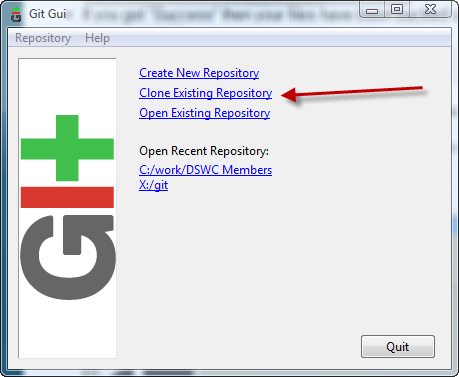
Start Git Gui from start menu or by right mouse click on any directory that does not have a repository.
Click the Clone existing repository link.
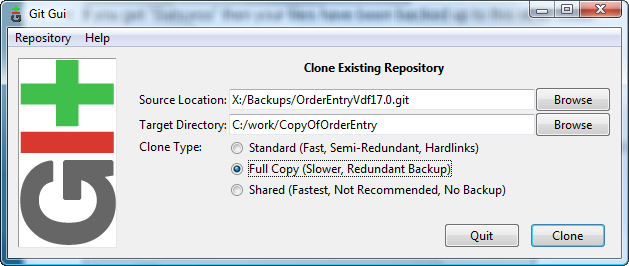
Enter the location of the Remote repository and the NOT YET CREATED target local repository and workspace.
Select the Full Copy, just to be sure. When you’ve worked with Git for a while feel free to experiment with the faster versions, but in the beginning you just want it to work.
When clicked clone, navigate your explorer to the new directory and confirm that you have the full workspace, as well as a .git local repository. You also will find the remote automatically added to the ‘Remote’ menu as ‘origin’.
If you added the .gitignore file to not be tracked (my mentioning it in the .gitignore file itself) it was not copied over into the cloned workspace. You probably want to copy this file manually here. It is recommended though that you do stage and commit this file into your repository.
Keeping multiple repositories synchronised
In previous sections you have created a new remote repository with ‘Add remote’, and created new local repository by cloning the repository from the remote.
We also discussed that a remote repository can be kept up-to-date with Push.
Suppose developer 1 makes a change to a file eg the remaining WinPrint report fonts are all changed from Arial to Segoe ui. The developer stages the files, and does a commit, this saves the changes into the local repository. He then at the end of the day does a push, to update the remote repository with these changes.
For developer 2 to retrieve these changes, two actions need to be undertaken. First the local repository needs to be updated using the menu option Remote – Fetch. Then the workspace (working tree in GIT language) needs to be updated with changes from the repository. This done by menu option Merge – Local Merge (or Ctrl+M), leaving the defaults in the merge dialog as Tracking branch.
When an automated 3 way merge can be done, this is very simple. When however conflicts occur they are shown to the user, than then can do a proper merge. Once developer 2 is finished merging the developer 1’s changes into their code he makes sure all is committed, then pushes the changes to the remote repository.
This sounds more complex than it is. Git also helps you with this. Basically git’s remote repositories do not allow a push, if there are un-fetched (pulled) changes. Therefore the developer would always be prompted to pull, merge, commit and then push.
Local and Remote branches
Local branches are not automatically pushed to the remotes. This leaves you with the freedom to use private branches for work you do not want to share.
If you do want to collaborate on a branch, you explicitly push the branch to the remote.
When a branch is pushed to the remote and other developers do a Fetch, they will automatically receive a reference to new remote branches, but you don’t automatically get editable copies of them (only a ‘origin/<branch>’. So if they want to contribute to the branch, they need to create a Tracking branch based on the remote branch.
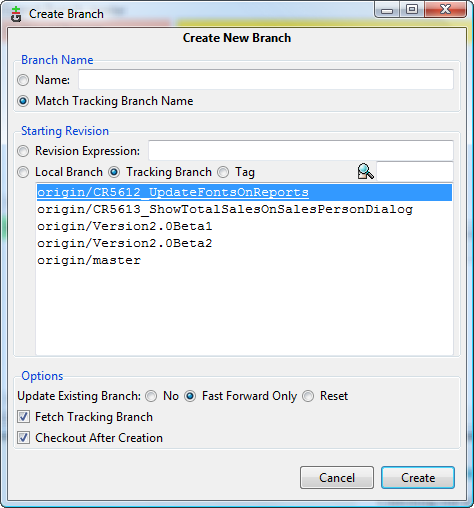
The tracking branch is to the developer like a local branch, except GIT knows the link to the remote branch, so a push will automatically update the correct remote branch. In Git GUI and specifically the dialog below the wording of the labels is confusing. Where it reads ‘Tracking branch’ it should be ‘Remote branch’. After all a tracking branch is the result of the action, not the source
So this creates a Tracking branch ‘CR5612_UpdateFontsOnReports’ (due to the ‘Match Tracking branch name’ setting), linked to the remote branch ‘origin/ CR5612_UpdateFontsOnReports’.
So a Tracking branch is a local branch that has a direct relationship to a remote branch. If you are on a tracking branch and do a push, GIT knows what remote and branch to push to. If you do a pull, It fetches all the remote branches and automatically merges in the changes from the remote branch.
Collaborating on a topic branches
Some great text on [1]
Browse repository
Gitk
Git-gui comes with a basic visualising tool gitk. It shows the commit and branch history, and the files and lines changed in these commits. It has some search facility in commit messages.
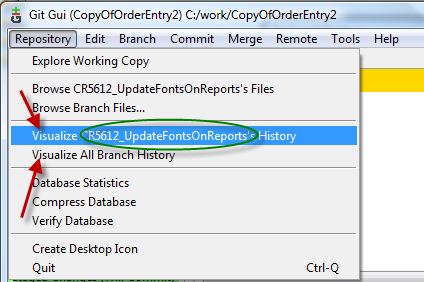
This visual commit viewer is started from git-gui by the repository menu options ‘Visualise <current branch> History’ and ‘Visualise All Branch History’.
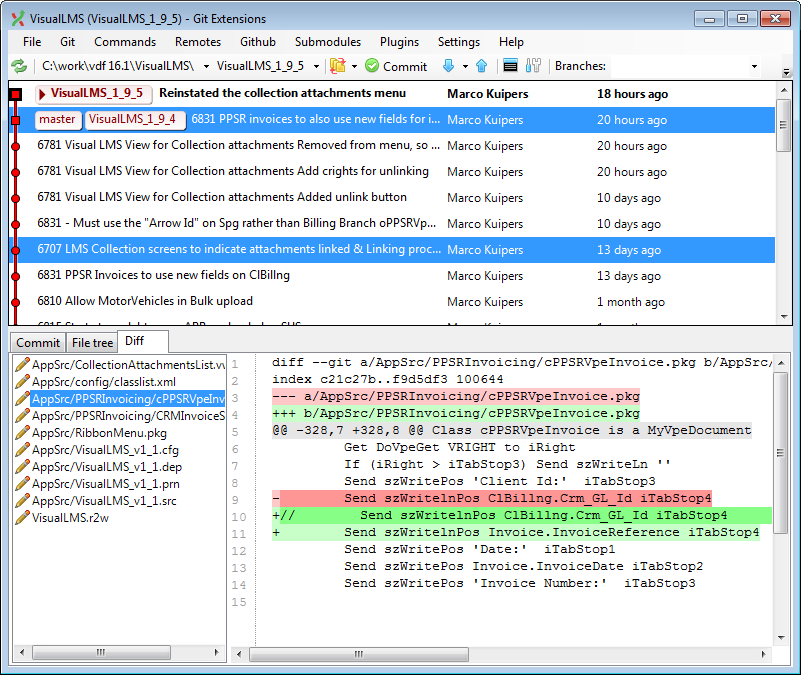
This does the job most of the time. But to get the most out of your carefully build version control documentation, you should have a look at git extensions. You can use git extensions exclusively, meaning you do not need any functionality of git-gui. For learning the basics of git, I believe that git-gui is an excellent way and not get lost straight away in the functionality of git extensions.
Git extensions
Git extensions is an active open source project. The source code is here https://github.com/gitextensions/gitextensions
However the latest version, wrapped in a windows installer is here http://code.google.com/p/gitextensions/ this is most likely the version you want.
It comes with a manual, that should after reading this document, be quite easy to follow. Especially chapter 3 browse repository is really good.
View commit log
In addition to seeing commit changes just like in gitk, you can also ctrl click any two commits to view the differences.
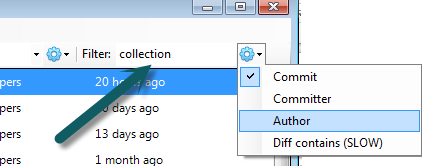
Search history
Using regular expressions in commit message, author and committer.
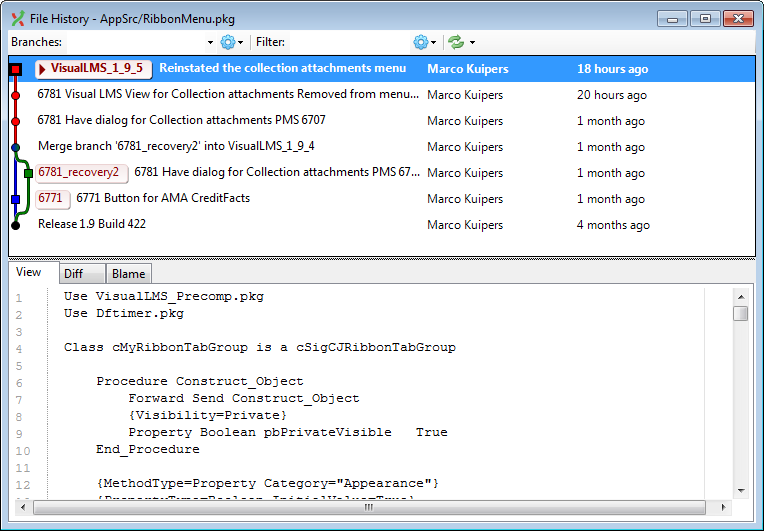
Single file history
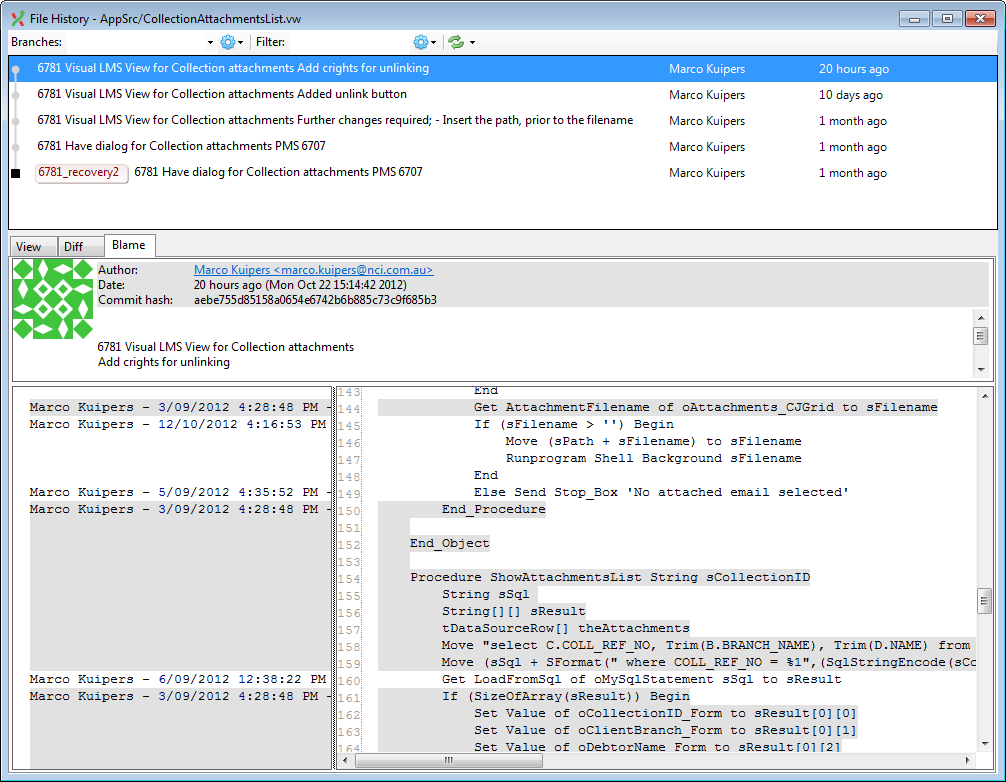
Blame
See for every line, when this was committed. Then double click to see other files of that commit.
Tips and Tricks
Unmodifying a modified file
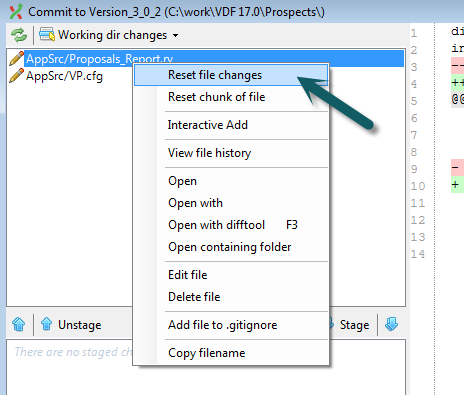
When you realise you don’t want to keep any changes to a file, you can unmodify it – reverting to what it looked like when you last committed (or cloned or merged etc).
In Git Extensions this can be done several ways. One of them is in the commit dialog;
Renaming of a file
GIT is really smart. If you rename a file, it detects that a file is missing, a new file appeared and the content is (almost) the same. It just picks it up and accepts the rename of the file as a change you can commit.
Extremely cool!
Libraries used by multiple workspaces
A great way to have copy of a VDF library workspace within every workspace that uses the library, while the version control helps you detect changes and merge them into the ‘local’ library.
More details are here; [2]
Unstage Line from Commit
Sometimes you might have done a number of changes to a file and forgot to commit these separately, while you would like to.
In that case just stage the file, click on the file in the second panel, then in the 3rd panel where you see your code select the lines and use right mouse click to Unstage lines from commit. You could also select stage specific lines when you have not staged the file.
If you cannot select the file, it just switches from Unstaged to Staged, you've click the file icon, instead of the name. Click the name instead.
Cherry picking
Apply a commit from another branch to the current branch. Only the lines changed in the particular commit will be applied.
This is the best way to apply e.g. a bug fix, made in the master branch, onto the development branches. Or if doing consecutive commits, in a development branch you only want to pick some to be updated in this new branch.
Keep uncommitted changes when changing branch (Stash)
Git protects you from loosing uncommitted changes to your files when changing branches. But sometimes you are just not ready yet to commit. You might be in the middle of some programming that is not ready to compile, while you need to attend to an urgent bug.
This function is not (yet?) in Git Gui, but is very handy. You will however find it in git extensions.
Alternatively in the command line (right mouse cick on workspace directory, select Git Bash. A command window opens. Run the commands ‘Git add .’ and ;Git stash’.
You notice that all changes are ‘removed’ from the working directory and you can checkout another branch. To retrieve the content of the stash, go back to the original branch and do a ‘git stash pop’
Then just change the branch to where you need to be working on.
Global .gitignore file
If you are sick and tired to add the .gitignore file every time in each new workspace, you can create a global ignore file. This drawback is that this is global for all projects, not just VDF projects. This only goes up if you use GIT also for other files where you do want to track some of these files.
In your user data directory you find your settings in a file called ‘.gitconfig’. Create another file in this directory with the name ‘.gitignore_global’, then update the .gitconfig file to add the excludes file reference as follows;
  ...
[core]
	excludesfile = c:/Users/Marco/.gitignore_global
  ...
You can also add this using the command interface and the command
git config --global core.excludesfile ~/.gitignore_global
If you are trying to rename eg .gitignore to .gitignore_global windows will bark at you as it sees the file as no name, only extension. If you however rename to .gitignore_global. (with an extra . at the end) it will bypass the validation and rename the file properly.
Setup a different merge and diff tool
You can select almost any merge or diff tool.
However the 3 way merge in beyond compare is a version only available in the Pro version. I would focus on getting to know git first.
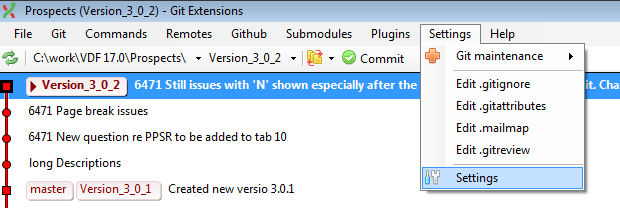
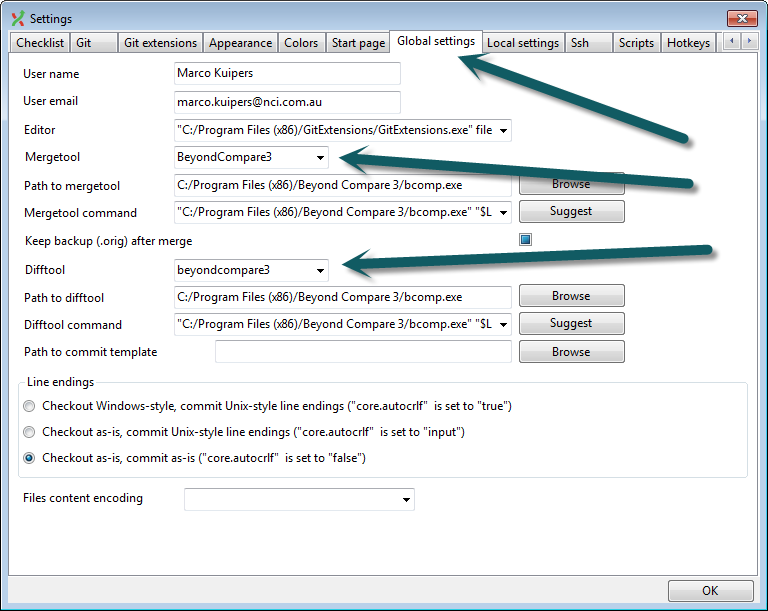
Channing the merge and diff tool, is easiest using a Git Extensions dialog;
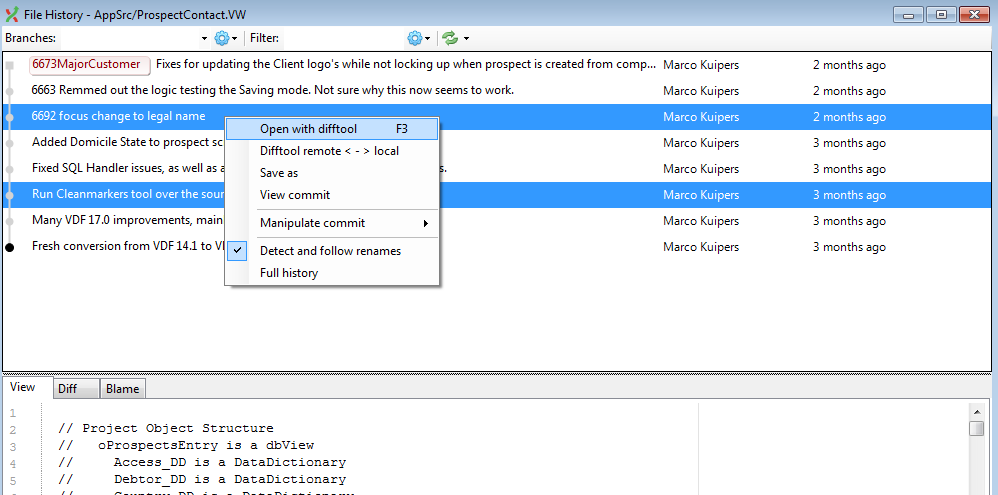
After this setting, eg in file history you can use this;
The panel of the commit changes will not be changed.
Loose objects warning
This warning can be really annoying and the check and possible warninig is fired each time that you start Git-gui. To stop the warning, start the Git Bash from your start menu.
Then type the following line and press enter
git config --global gui.gcwarning false
Then close the git bash and the check/warning is gone.
Committing PRN files, but exclude from viewing diff
Earlier we suggested to add the PRN file to the list of ignored files. However it could be interesting for line numbers of user reported errors. When you do not exclude the PRN, you might find that expecially a larger file with slow down the show difference when clicked by accident.
One trick you can do, is to tell git that a .prn file is a binary file. In that case it will not show any differences, just that they differ. This way you can stage and check in the file, and this retrieve later when required.
Create in your work directory a file with the name ‘.gitattributes’ and content ‘*.prn binary’.
Renaming of a remote
If you want to rename the alias of a remote you can issue the following command
git remote rename <currentName> <newName>
Tagging
You can like most Version control tools, tag specific points in history. Generaly this is used to mark release points (v1.0 etc).
To create an annotated tag (so all information is stored), use the following command:
git tag –a <tagName> -m <tagMessage>
If you forgot to place the tag and done some work already after, you can still tag that point in time. Have a look at Tagging on [3]
Removing a Recent Repository from git gui start screen
When git gui is started from a directory that does not contain a repository, it will show create/clone/open options as well as 'Open Recent Repositories'. These are loaded from the global .gitconfig file.
In my case this is on windows 7 and logged in as marcok; C:\Users\marcok\.gitconfig You can remove the recentrepo entries that you no longer wish to have in this list.
Rather than directly changing the text file you can also use the git bash line:
git config --global --unset gui.recentrepo "C:/work/VisualLMS"
Further reading or reference material
| Git reference; an easy to read quick reference. Although it focuses on the commands (using command line), it makes the dialogs in Git Gui easy to understand what the options mean. | http://gitref.org/index.html |
| A beginner tutorial, most of the content is covered in this white page. | http://matthew-brett.github.com/pydagogue/git_gui_windows.html |
| Pro Git book | http://git-scm.com/book |
| DataAccess Blog: Configuring Source Control for Visual DataFlex | http://support.dataaccess.com/Forums/entry.php?116-Configuring-Source-Control-for-Visual-DataFlex |
| DataAccess Blog: Source Control and Visual DataFlex 101: The Basics | http://support.dataaccess.com/Forums/entry.php?117-Source-Control-and-Visual-DataFlex-102-Multi-Developer-Use |
| DataAccess Blog: Source Control and Visual DataFlex 102: Multi-Developer Use | http://support.dataaccess.com/Forums/entry.php?92-Source-Control-and-Visual-DataFlex-101-The-Basics |
If you like this article, find issues or need more explanation on any of this, please send me an email. My email is m dot kuipers at internode dot on dot net
